
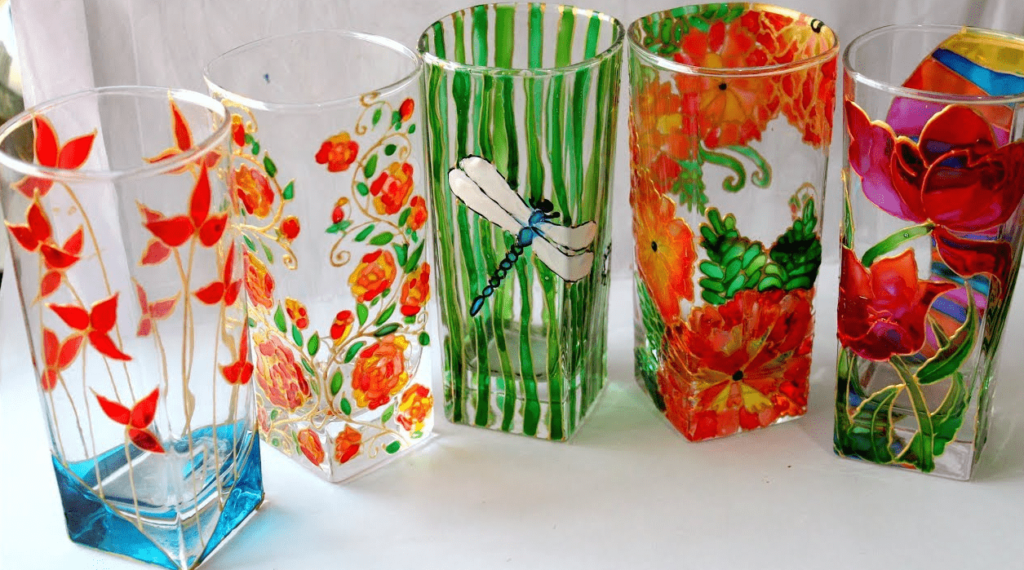
Most of the DIY guys have the hobby of painting on weekends. It can be painting the dog house or just a vase. But you will need a bit of expert help when you are up to painting a glass vase. Also, you must the different ways to do it.
The reason for it is the surface of the glass is much smoother than other vases. Here a query gets into your mind, how to paint the outside of a glass vase?
Well, the answer is pretty simple. Following some instruction with the versatility of your painting skills, you can do it anytime you want. That’s why we are here to make the way straight and smooth for you. Have a look!

What kind of Paint will Stick to the Glass
Glass has a smooth surface on both sides. Therefore, the glass product needs paint that adheres to it for a long time without drying out entirely. Hence two types of paints are mainly considered for use on glass- Enamel and Acrylic paints.
Some experts also prefer solvent-based paints and glass paint markers as a temporary solution. Now, if you have a query about what is the best paint to use on glass vases, we will prefer acrylic paint off the enamel. Here are the reasons-
- Acrylic paints give a great colorfastness on the glass. Therefore, the color glows for a longer period and provides the binding force of dye till fading away.
- The acrylic base is made of such chemical additives that give the exact stickiness glass need. So, it sticks on a no-porous glass surface as much as the glass needs.
- The paint has great flexibility in its texture and dyeing. That’s why it doesn’t dry up completely like the enamel paint over time.
- If you want to keep the color with a glass effect, acrylic color is the best one. It has decent opacity of transparency that makes the glass visible as before.
- Acrylic paints have a washable feature. It is pretty handy when you are having it as a base for kids or don’t have to worry about dusting it regularly.
How to Paint on the Outside of a Glass Vase
Before painting a glass vase, you have to decide what finishing you need for it. All the materials for the preparation depend on it. Well, we will prefer four selective finishing you can use on a glass vase. Here they are,
- Simple finish with a brush.
- Simple chalk finish with spray.
- Limestone finish with spray.
- Multiple-tone Finish with spray.
Simple finish with brush
This is the artistic technique of all. You can create any texture on a vase, even with shapes on it. Therefore, the shapes and the texture need to be precise on your head. Here’s what you will need before the painting.
- An xl paintbrush for the main texture.
- Baking soda and a bowl.
- Any interior paint i.e., Sherwin Williams.
- Different sizes of brushes as per the shape textures.
The painting process
Step 1
First off, wash out the glass vase with alcohol and dry it up entirely. It will be better if you dry it up with a hairdryer to do it quickly.
Step 2
Make a mix of the paint and baking soda in the bowl. The ratio will depend on the finishing texture you want. So, the deeper the texture you need, the more baking soda you mix. Also, the size of the vase varies the amount of the mixture.
Step 3
Grab the xl brush and put it into the bowl. Then, start the painting on the outside of the vase. If you want a straight lineup, you must use the brush from the top to the bottom at once.
Do the line-up until the finishing texture you want comes up. Then wait for at least 30 minutes for the coating.
Step 4
Then, you can go for any shape with smaller-sized brushes on it. Hence, the straight texture must have deeper for the shape on it. To do it precisely, you can practice the shapes before the final painting.
Step 5
Keep the vase in such a place where the sun can’t directly heat it. It may take 1-2 hours to have the finishing texture glow come up. After that, you can use it.

Simple chalk finish with spray
If you want a non-textured matte look on the glass vase, this finishing will do that. This finishing will give a simple but compact look. Here are the materials you will need-
- Chalky finish spray paint.
- Large dump papers.
- Gloves.
The painting process
Step 1
Try to buy popular acrylic paints like Krylon for better chalky finishing. Put the dump papers at least in for 10 feet in the square. Then, wash and clean the glass vase properly.
Step 2
Dry the vase up and wear the gloves before starting the painting. Now, you can do the painting in two ways. One is spraying the paint keeping it in hand and another one is spraying the vase keeping it on the ground in the middle of the paper.
As it’s a solid texture we are having on the vase, we prefer you to keep it on the floor. Then, shake the spray can before spraying to speed up the process.
Step 3
Keep the can closer to the vase and spray the paint lightly. Here, you must go for at least three layers of coating on the vase and increase the pressure only after the first line.
Shake after every time you have a line and wait at least a minute between the coating. When you will you are done with your preferred color on the vase, dump the papers.
Step 4
Put the vase in an airy place and wait for 3-5 minutes. The color will create the final finishing in that time and will be ready to use.

Lime-stone finish with spray
Ever heard the name of Krylon fine texture paint spray? Well, you must get such spray for premium texture with the lime-stone finish on the vase. The painting process is pretty similar to the chalk finishing one. Here’s what you will need for the process-
- Limestone spray.
- Polyester sheet.
- Gloves.
The painting process
Step 1
Firstly, keep the glass vase clean and dry. Cover the floor with the polyester sheet and put on the gloves.
Step 2
Now, you must read out the disclaimer on the paint can. Most of the fine texture paint mentions keeping at least a 10inch distance from the vase while spraying.
It’s because they can spray the paint with a much bigger paint line than others. Also, you have to shake it 1-2 minutes before start painting.
Step 3
Hold the vase keeping the distance and start spraying on it. Don’t wait up for the next line as the spray coats faster than other paints.
Step 4
Spray spontaneously till you reach the final coating you want. The finishing texture will show up right after you finish with the spraying.

The multiple-tone finish with spray
This finishing combines texture and no-texture into one vase. All you have to do is the areas for the texture and design it for perfection. Here are the tools you will need to start the painting.
- Tissues.
- Fine texture spray.
- Chalk spray.
- Tape.
- Gloves.
- Dump papers or sheets.
The painting process
Step 1
Begin with making the glass vase spotless thorough cleaning. Then cut shapes on the tissue for the texture you want on the vase. Put the dump papers on the floor and wear gloves.
Step 2
Put the tissue on the vase. It should be right on the angle you want from the outside and keep the end inside of the vase. Tape it precisely so that the texture doesn’t lose its shape.
Step 3
Spray the fine texture paint on the empty part of the vase, like the limestone one. Stop only when you have covered every texture area. Then remove the tissue instantly.
Step 4
Now, you can use the chalk spray in the same process we just mentioned. It’s up to your choice if you want it or not. Dump the papers when you are finished with the painting.
Final Verdict
A glass vase can be a perfect gift for your buddy if it has a cool design on it. Now that you know all secrets about how to paint the outside of a glass vase, it’s an hour’s work. But always put on a mask and other stuff for the spray and brush painting and follow the steps as mentioned.
Have fun with painting!